Wednesday 7 June 2023

New Azure KMS IP and domain Addresses for activation

For Windows virtual machines deployed into Azure using marketplace images you may have created rules in your NSG or firewalls to allow the server to communicate the Azure KMS activation service. This used to be kms.core.windows.net and had an IP address of 23.102.135.246. As of March 2023 Microsoft has moved to a new address azkms.core.windows.net and has two IP addresses "20.118.99.224" and "40.83.235.53". The existing address kms.core.windows.net is pointed to the new IP of 40.83.235.53. 

So if your servers are having issues with activation please check your rules to ensure they have the new IP addresses and you can resolve the old and new domain names (azkms.core.windows.net, kms.core.windows.net)


Monday 13 June 2022

Visual Studio and Azure Services access behind a firewall

There is an article by Microsoft that lists all the URLs that Visual Studio requires to install or interaction with Azure services if you was behind a firewall or proxy. Obviously you don't have to allow everything through but you can see what you need to allow through if there was something specifically needed. I know after the pandemic most people are working from home and have a direct access to the internet but there are environments where access are still very control behind firewalls. This document provides the URLs, the ports it uses and a brief explanation about why it is needed which is always useful when you are speaking to your security team on why you need to punch another hole through the firewall.


Snippet of web page which list why each of the URLs are required and for what service


Tuesday 6 July 2021

Configuring PIM access policies for Azure resources

On my previous post I described how you can onboard an Azure subscription or management group to Azure PIM (Privileged Identity Management) so that you start creating conditional access for Azure resources. In this post I am going to go through an example on how to control access to a particular resource.

Pre-requisites

You will need to have onboarded the subscription or management group that contains the resources that you wish to configure access. You will need “Owner” or “User Access Administrator” role permissions on the resource(s) that you wish to configure. 

  • Under “Azure AD Privileged Identity Management” blade click “Azure Resources”
  • By default, you will only see the subscriptions and if you wish to assign permissions at other levels then you will need to select filter “Resource Type” Please note ensure you have sufficient privileges to see the resources (Need to have “owner” or “User Access Administrator” roles)

  • Once you selected filter "Resource Type" you have options to select which resource type to show

  • As we selected the filter to just show resource, resource group and subscription you can now see all the resources listed based on the permissions I have. We will select “rg-ppe” resource group to be configured

  • The overview page shows some general statistics about any PIM activities, who might have activated a role at “rg-ppe” resource group, etc. To start configuring PIM for this resource group, select “Assignments”
  • The default view will show if you have any “eligible” assignments that have already been configured at this level or inherited. As we are going to create a new assignment we will select “Add assignments”

  • On “Add Assignment” screen, check under Membership to confirm you have selected the right resources and resource type. Now under “Select role” you will decide which built-in Azure or custom role you would like to assign for this resource group

  • I have selected the “reader” role. Next under “select member(s)” click “no member selected”. Add the users or group that you would like to be eligible for this role

  • Check you have selected the right role and member(s) for this role then “Next” to continue

  • Select if you would like the role to be “eligible” or “active”. Eligible means members of this role have to perform one or more actions before they can use the role. An example could be they are required to use MFA or provide a ticket number. Active means members of this role do not need to perform any actions and are always assigned this role. We will be selecting “eligible” and with this assignment type you have an option to adjust the start and end date/time for this role. Example, a new contractor has been hired for six months (Jan-June). The contractor is expected to do some work on the resources under our “rg-ppe” resource group between Mar-Apr. We can adjust the start and end date to be between Jan-June or we can be more specific and have it start Mar-Apr. By further restricting it the contractor will only see it available during the assignment time/date. We will leave it as default of a year and click “Assign”


  • Under “Eligible assignments” you should see the “Reader” role and the users and groups we have assigned for this role. Right now, the role will have the default access control to activate the role. To make changes we need to the access policy click on “settings”


  • On the settings screen search for the role that you would like to change. If under “Modified” column you see “Yes” it means the default settings has been modified already. We are going to select “Reader” as this is the one we are working on for this example
  • First check that we are modifying the right resource and role at the top. This page will show the current settings and to edit click on “edit” 

  • Under “Activation” tab we will make a change to “activation maximum hour” which at default is set to 8 hours. I will change it to “1”. Select “Update” but if there are other settings then click the other two tabs (Assignment or Notification)

We have now finished configuring a privilege access policy for our resource group "rg-ppe" so we would now need to login with a user that was assigned this particular policy.

  • I will login with the user “Yuna” and navigate to Privileged Identity Management page and select “My roles”

  • By default it will be on Azure AD Roles so click on “Azure Resources”
  • You will see under “Eligible” what roles you have been assigned, which resource the role has been set at and the end time. Click “Activate” to start the process

  • You will now see the maximum hour that I can select is "1" and I have to state a reason why I want to activate the role. Once some text has been entered click “Activate”

  • Wait for the role to be activated which you can see is a three-stage process. Once completed the browser should refresh but you may need your credentials again if prompted

  • Screen will refresh back to "Eligible assignments" tab. Click on "Active assignments" to see that you role is active and you can see end time and a option to "Deactivate" the role before the end time
You have now configured privilege access for a specific Azure resource and there are many more options that you can configure. For example requiring MFA or additional users to approve the role before it can be used. You can also configure notification settings so that you get notified if someone has activated the role. This is a great additional feature to be used if you have Azure AD Premium P2 license to further enhance your Azure resource access.

Wednesday 30 June 2021

On board Azure Resources to use Azure AD Privileged Identity Management (PIM)

If you have Azure AD Premium P2 licences one of the reasons would of been to use Privileged Identity Management (PIM) as its a great tool to help provide "just-in-time" privileged access for resources where you don't need permanent access to. 

In this article I will be going through how to onboard Azure resources into PIM so that you can control privileged access for your Azure resources as well. This means you can create conditional access policies for certain resources, resource groups, subscriptions or even management groups to ensure users only have the required permissions at the right time. 

An example would be, by default you assign reader role for IT operations staff so that they can see all the resources. If they decided they need to make a change they would need to use PIM to activate a particular role you have assigned them which gives them permissions to make the change. As part of activating the role you might want to add some conditions. You might add that users need to use mutli-factor authentication, include a ticket number, require approval and limited the maximum amount of time the role can be activated for.

Below are the steps to get started to the journey...

There are some pre-requisites to start with

  • Azure AD Premium P2 license
  • You will need “Owner” or “User Access Administrator” role on the Azure resources that you wish to on-board to PIM.
Please note, once you have on boarded a management group or subscription to be managed you can not unmanage it. This is to prevent another resource administrator from removing Privileged Identity Management settings. The only way you can unmanage it is to delete the management group or subscription.

  • Login into https://portal.azure.com. Use the search bar to find "Azure AD Privileged Identity Management"
  • Under "Privileged Identity Management" blade click "Azure Resources"

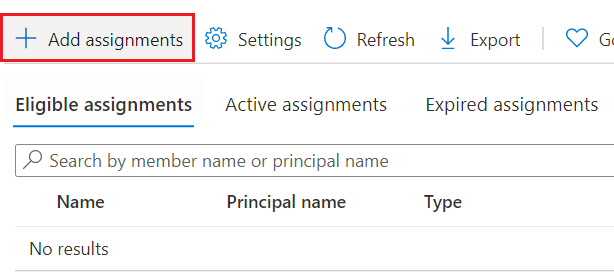
  • On this screen if you or someone has already onboarded some Azure resources you will be able to see it here. Please remember - You may not see some resource either if you don’t have the correct permissions for those Azure resources. Click on "Resource type" or “Directory” filter to provide you more options to see what resources have been onboarded. You may need to click on “Refresh” to ensure the content is refreshed as there has been a few times where the screen doesn’t seem to automatically refresh

  • If the resource has not been onboarded yet, then click on “Discover resources”

  • By default, this screen shows resource state “Unmanaged” and resource type of “Subscription”. As you can onboard subscriptions or management group you will need to change the filter so that you can see all the management group or subscriptions that have not been onboarded. Again remember to select “refresh” so that the resource screen refreshes. The screen below has been selected to show “All” resource type

  • We are going select the resource we would like to onboard. For this demo we are selecting our “Free Trial” subscription. Once you have selected the resource/s that are to be managed by PIM you will be able to click “Manage resource”

  • A warning message will appear highlighting that all child objects of the resource will be managed by PIM. For example, for a management group the possible child objects would be management group, subscription, resource group and resource. For a subscription the possible child objects would be resource group and resource. Click “OK” to continue

  • On the top right of the screen if you click on the “bell” icon you should see the task of resource being onboarding

  • Once the task has been completed you will see on the screen that the “unmanaged” resource is not listed there anymore. You will need to click on “Privileged Identity Management” to go back to Azure resources screen

  • On the screen below you can see “Free Trial” subscription has successfully onboarded to PIM for you to start configuring roles to be controlled by PIM

We have now onboarded our "free trial" subscription to our Privileged Identity Management services which means we can start configuring just-in-time privileged access to Azure resources. In my next article I will describe how configure access to specific resources. 


Thursday 6 May 2021

Azure Resource Naming Convention

One of the key governance when deploying resources to cloud is to have a good naming convention. A good naming convention should help people quickly identify what the resource is and any relevant information that could prove useful, for example, location(uks, ne) or environment(prod, preprod, etc). You might see a VM resource reporting unhealthy and just by the name you are able to identify the location it is running from and which environment without needing to query for more information. People can then make a quick judgement call if they need to priorities to fix this particular VM or it can be dealt with later.

So how do you start and any good framework to work against? In Azure world Microsoft has create tons of material called "Cloud Adoption Framework" CAF where you will find best practices, guidance and tools from Microsoft to get you going. https://docs.microsoft.com/en-us/azure/cloud-adoption-framework/

Below are a few articles that I have drawn out from CAF which I have use often to give me ideas for naming conventions.

A quick article to give you an idea of how you might want to define overall the naming convention for your resources in Azure with some examples.

https://docs.microsoft.com/en-us/azure/cloud-adoption-framework/ready/azure-best-practices/resource-naming

The following article gives you some ideas on the recommended abbreviations for various Azure resource types if you can't think of any

https://docs.microsoft.com/en-us/azure/cloud-adoption-framework/ready/azure-best-practices/resource-abbreviations

This final article is important as it highlights the naming rule and restrictions for Azure resources. The important column to look out for is "Scope". There are three possible scope at present and they are;

  • Global - This means this resource name has to be unique across the Azure platform as it is expose out as a possible public endpoint. An example would be Storage Account Name. You may never expose your storage account publicly but because you have an option to expose it, hence at creation time this has to be unique.
  • Resource Group - This means the resource name within the resource group for a resource type has to be unique. For example you can not have two managed disk with the same name but you could have a network interface and a managed disk with the same name as they are two different resource type.

  • Resource Attribute - This means this has to be unique to the parent resource. An example with file services shares within storage account has to be unique. You will not be able to have two file share name the same under the same storage account.

https://docs.microsoft.com/en-us/azure/azure-resource-manager/management/resource-name-rules

As always these documentation are just best practices and you should adapt it to suit your needs within your organisation. One key takeaway is to make sure the naming convention is documented and kept up to date where possible. As you start to automate processes or builds you will find that with a good naming convention you will be able to make your scripts more generic. 

For example, you wanted to know how many disk are OS disks. If you had followed the recommended best practices then any disk that you have deployed and is an attached as an OS Disk for a VM would have the words "OS Disk". Of course you could still find out if a disk is an OS disk by querying each VM and getting the OS disk attribute but what if you just had a bunch of disk not attached to a VM or just did a restore of disks? it would be very hard to identify and your script would be time consuming to write and run.


New Azure KMS IP and domain Addresses for activation

For Windows virtual machines deployed into Azure using marketplace images you may have created rules in your NSG or firewalls to allow the s...