Saturday 19 December 2020

Going further back for Azure Consumption in PowerBi

When you connect PowerBi via Microsoft Azure Consumption Insights (Beta) connector you will get the last month of consumption data and you may want to report further back. There is a way to do it where you can report back up to a maximum of 36 months.

If you follow my article https://blog.myvmx.com/2020/12/using-azure-tags-in-your-powerbi.html up to step "On the menu bar select "Transform data > Transform data" first.

On the menu bar select "Transform data > Transform data"

 
Under the "Home" ribbon locate and select "Advanced Editor"

You should see the query that has been applied which is currently based on this format
let
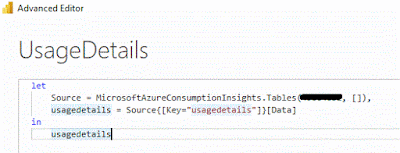
    Source = MicrosoftAzureConsumptionInsights.Tables(EnrollmentNumber, []),
    usagedetails = Source{[Key="usagedetails"]}[Data]
in
    usagedetails
We would need to change it to
let
    enrollmentNumber = "EnrollmentNumber",
    optionalParameters = [ numberOfMonth = 3, dataType = "DetailCharges" ],
     usagedetails = MicrosoftAzureConsumptionInsights.Contents(enrollmentNumber, optionalParameters)    
in
    usagedetails
Under "optionaParameters" for the "numberOfMonth" you can change that number up to a maximum of 36 months. 

Once you have made the changes then click "Done" and wait for the query to load up. At the menu of the Power Query Editor select "Close & Apply" which would start to apply the query changes
You should now be able query consumption data back up to the number of months that you have inputted as part of the query.
 
Happy querying!!

Friday 18 December 2020

Changing Service Admin Account in your Azure Subscription

By default, when you deploy your new Azure subscription the "Service administrator" is the same as "Account administrator" which means that this account has permissions to both the EA portal and the Azure portal. For us we had to change this as Azure Account team didn't need access to the Azure portal. To change this, it was a simple process as both the Service administrator and Account administrator is the same user. 
 
First go to https://portal.azure.com with the account that you used to sign up for the subscription then head to subscriptions and locate your subscription. If we want to check to make sure you are logged in as the "Service Administrator" then click "subscriptions" then go to "Access control (IAM)" then "Classic administrators" tab and you should see the your account there with the role of "Service administrator".
As we are still in the subscription blade click on "properties" and click on "Service Admin"
On this screen enter the email address you would like to assign to the "Service Admin" account and click "OK". Please be aware it does not check if the account exists.

You may need to give it a bit of time by clicking around other parts of the subscription or sections of the subscription blade. Afterwards if you go back to the subscription properties you should see that the "Service Administrator" should have changed to the account you have specified. You can also go to  "Access control (IAM)" then "Classic administrators" tab and that should of changed to the new account you specified.

Remember once you have changed it the "Account administrator" will lose access to the Azure Portal which is the affect that I was after. 

Now the tricky bit is that we wish to change the "Service administrator" now as the user ([email protected]) will be leaving the organisation so how do we do this? Well you need to check again at subscriptions > Properties and see who is the "Account administrator". Next check if they have "owner" permissions or "Co-Administrator" role within the Azure portal by either logging in as them or go to the subscription "Access control (IAM)". You have 3 options to check the permissions.

"Check access" tab, if you want to check against the account you are logged in as then click "view my access" otherwise find the user account you would like to check then once you have located it then click on the name. You will have a new pop up blade which will display the permissions

You can see from the above image that "Kin Yung" account has the relevant permissions (Owner or Co-Administrator).

The other two options are "Role Assignment" where you must see if the account is listed with "owner" permission. Under "Classic administrators" you will be looking to see that it is listed as "co-administrator"

If the account doesn't have permissions then they need to ask someone to temporary assign them the either the role of "owner" or "co-administrator". You can do this by going to the subscription > "Access control (IAM)" then "Add". Select either "Add role assignment" or "Add co-administrator"

If you select "Add role assignment" then make sure the role as "owner" and then search for the user account in your directory to be assigned the role.


Please Note: According to Microsoft documentation Contributor only "Grants full access to manage all resources, but does not allow you to assign roles in Azure RBAC" so you will need to grant the user "owner" permissions

If the user logged in doesn't have permissions, you will see the "Service admin" button greyed so you need to make sure that the account has permissions by doing one of the options above.


Once you have granted the "Account Administrator" permissions to Azure portal then they can log in and change the "Service Administrator" to the desired account following the steps above.

Remember once you have finished this work to remove the account from "owner" or "co-administrator" permissions from the Azure portal. 

Although Microsoft states that "Service Administrator" account is for classic Azure but I feel it's best to use an account that is valid in case there is something that needs to use it. 

You can assign additional "co-administrator" by going to the subscription and selecting
"Access control (IAM)". Click on "Add co-administrator"


Now select the accounts that you wish to add as co-administrators from your directory and click "OK"

Once added go to the "Classic Administrator" tab and you should see the new account you have added and it will be listed as "Co-Administrator"


Monday 14 December 2020

Using Azure tags in your powerbi reporting

So you have gone through the hard work of defining tags and its value for all the resources in Azure portal which you want to make use of them when reporting the costing in PowerBi. Here I will describe how you can expose those tags for billing purposes so that you can filter your costing via tags as well.

First of all we need to get the API access key and enrollment number which you will need to ask whoever that has access to your Enterprise agreement information. You can check if you have access by going to https://ea.azure.com in case someone has given you access. Within the EA portal you will see your enrollment number on the top left of the screen which you will need to note down. To get the API access key you will need to click on "reports" then go to "Download Usage > API Access Key". You will see two keys, make sure you have a look at the effective date (remember US date format). Once you have decided which key to use then click on "expand key" and select "copy" to capture the whole key. If both has expired then clic on "regenerate" for one of them.


Now that you have both the enrollment number and API access key then we can move on to working within PowerBi desktop version. The version I will be using is dated as October 2020 (2.86.902.0 64 bit)

When you start up PowerBi desktop if you get the start up screen then select get data otherwise on the menu bar select "Get Data > More"

This should open up a new window and select "Online Services" followed by "Microsoft Azure Consumption Insights (Beta)" then select "Connect"
You will receive a warning about the connector is still under development but I think I have read somewhere below that they are not actually going to develop this anymore. You can click continue to carry on.
You will need to enter your enrollerment number which you have gathered at the start of this task. Once you have entered your enrollment number click "OK"
You will now need the Account Key which is actually the API key that you have gathered as the first step so enter the API key and select "Connect"

To keep it simple I will just select the "UsageDetails" table and click "Load". Now wait for the data to be downloaded which could take some time.

Once loaded you will see on the righthand side there is a "fields" section and if you scroll down you will only see "tags" as the possible selected field. The idea is to try and break out all the tags in this field so that we can can make use of the tags that we have defined and to use those as filters.

On the menu bar select "Transform data > Transform data"
You will be in the power query editor now. Scroll across to find the "Tags" column. You should see all your tag name and values all within this field. Right click on the column to bring up the menu select Transform > JSON. Give it some time to process
Once the transformation is completed click on the icon next to the Tags column as shown below and wait for the tags names to load up.
Select the columns you want and then click "OK". Again wait for the new columns to be created
Once they are created you will see them and they will be prefixed with "tags." followed by your tag names
At the menu of the Power Query Editor select "Close & Apply which would start to apply the query changes.
If you now look at the fields section you will see that the Tags field has disappeared and the tags values that I decided to expand are shown here for me to select.


So now you can build queries and make use of the tag values that you have defined for your resources in your subscriptions.

Speed up Azure policy compliance scan

One of the painful things when I first started to use Azure policy to conduct audits was that it could take up to 24 hours before it would do it first initial scan. If I was to make changes it could take up to 24 hours before the policy would run again. Going backwards and forwards like this means usually it could take up to a week before the policy I am writing could be completed. There were ways to speed it up by either: issuing API calls to force a rescan but it was something that I couldn't quite grasp at the time or you could delete the policy and recreate it which would trigger a initial scan which nowdays should run within a few hours.

Moving forward now, there is a powershell cmdlet to help speed up the policy rescan which can be targeted at specific resource group or a complete subscription. At present there doesn't seem to be a way with powershell to trigger a specific policy rescan.

Here is how you do it

As this cmdlet is based on the new Az modules I tend to just use the cloud shell which you can launch once you have logged in to the azure portal (https://portal.azure.com)

If you have access to multiple subscriptions then the first cmdlet to run is Set-AzContext -Subscription "Replace_With_Subscription_Name" so that we are working within the correct subscription context

For me I always attach a policy to a resource group first and tend to test the policy against resources within a resource group. The cmdlet to use is Start-AzPolicyComplianceScan which will do a full scan across the subscription that is in context. To do a scan for a specfic resource group you would use Start-AzPolicyComplianceScan -ResourceGroupName "Replace_With_Resource_Group_Name". Below I have start the scan as a Job where we wait for the job to complete. The command used is $job = Start-AzPolicyComplianceScan -AsJob.
As I said before we are running this as a job which means if you was to chain more powershell commands then they would not run until this job is completed, To see if the job is completed or not then we issue $job to see the status. Once you see the status as per below then it means the scan has completed.
Now go into the Azure portal and go to policy > compliance section and select your subscription. Look for the compliance of your policy and see if it has changed. If it has not changed the click on refresh a few times and hopefully you will see your changes.

I have found this cmdlet really useful as it helps me see my changes to the policy definition quicker and I can edit and amend changes faster.


For more information go https://docs.microsoft.com/en-us/azure/governance/policy/how-to/get-compliance-data

Monday 7 December 2020

Azure Service Health Alerts

One of the first things to do once you have a Azure subscription created is to set up a service health alert. These alerts will tell you if Microsoft are doing any maintenance or having trouble with a particular service. These alerts are not designed to tell you specifically if your resources will be impacted but more as a overall health status for services so that you are aware that there are issues on the platform.

Setting up ...

First login to your subscription via https://portal.azure.com. Once you have logged in then use the search bar to locate "Service Health"

You will be taken to the Service Health blade which will show you any current issues within Azure. From here you can drill down to the data centres on the world map or see what issues that have been trigger in the last seven days. To add a service health click on "Add service health alert".

You will be taken to the "create alert rule" page. 

The rule can only target one subscription so under "subscription" select which subscription you would like to create this rule in.
Next select what "Services" you would like to be alerted on. I decided that I only want to get alerts on virtual machines as that's all I have in the subscription.
As my virtual machines are only in North Europe so I have just selected "North Europe".
For service health criteria you have four possible event type and we are interested in two of them which is "Service issue" and "Planned maintenance".
The next section is what would action would you like Azure to take when it triggers this alert rule. I am not going to go in to how to create the action group or what options you have. This article will guide you through it (https://docs.microsoft.com/en-gb/azure/azure-monitor/platform/action-groups?WT.mc_id=Portal-Microsoft_Azure_Monitoring)

Click on "Select Action Group".

Select the action group to associate with this alert rule and click "select".
Give your rule a name, any description that you want to add. Select which resource group you wish to save this rule to. Ensure "Enabled alert rule upon creation" box is checked.

Once you double checked that all the settings are how you want them to be then click on "Create alert rule".

Once the rule is created, on the Service Health blade select "Health alerts" and drill down to your subscription and you should see the alert we have just created. You will see the "details" of the alert, the settings you have defined and if you click on "history" you will see when this alert was last fired out as well.

Below is a sample alert that you may receive which you can see that it is notifying us that there is a problem with Log Analytics and Application Insights in North Europe. A tracking ID has been assigned by Microsoft which you can search for within the portal to get further updates on it.


Examples of how I have used the alerts, my team and BCDR team receives all the service outage alerts so that we can see what the trend could. It could be that we are seeing a particular services failing globally affecting one location/region slowly at a time. We can then antipcate or start to see what we can do to prevent our services from being impacted. ie start to do failovers or contact our users to let them know we could be impacted or go to manual procedures etc. We also set up a separate alert which monitors the outage/maintenance where we have deployed our resources. When we receive alerts from this rule then we would notify support teams where their resources have been deployed in those specific locations to let them know that they could be affected.

As you can see setting this up will be useful for you to receive alerts if there are any outages or maintenance planned by Microsoft which could affect the services you have deployed. Just remember to select on services and regions where you have deployed your resources otherwise you may miss an alert. 

New Azure KMS IP and domain Addresses for activation

For Windows virtual machines deployed into Azure using marketplace images you may have created rules in your NSG or firewalls to allow the s...