“Managed” disk has been around in Azure for a few years now and is the standard for deploying with VMs. I started deploying VMs when “unmanaged” disk was the standard and you had to plan carefully how many disk/s, IOPS you needed and strategically place those disks in the right storage account to ensure that it can deliver those performances. We were using spreadsheets to help us track which disk was in which storage account and making sure we weren’t hitting the max IOPS limits that the storage account could delivery. Over time it just got very very messy and complex to manage.
With the introduction of “managed” disk it took all those pains away and Azure was dealing with them in the backend. We could change from SSD to HDD and vice versa easily, snapshots were just a few clicks, we didn’t need to search in storage accounts for orphaned disk where we were paying for because we forgot to decommission them as part of the VM. With managed disk we just had to work out how much disk space we needed, the amount of IOPS needed and then select the disk that matches it as closely as you can to your requirement.
Previously for standard HDD, Azure would be charging you based on the amount of data you were writing to disk and not the actual size you have assigned to the disk. For example, if you had a 100GiB disk and had only 40GiB data written then you would be charged for just 40GiB. If your disk was SSD then you would be charged overall on the disk size you have assigned, so with the example above you would be charged 100GiB even thought you have written just 40GiB of data. So, if you were using standard HDD this pricing method worked well as you could provision the disk size to be quite big and not worry about the cost just like how you would do it on premise on systems like VMware. With SSD you had to be careful as it was size dependent and not based on consumption of space.
Microsoft have moved to a standard tiering cost for a while now across all type of disk that they offer. Below is a sample of the fixed disk sizes and the tiering name for each type of managed disk.


So why did I bring this topic up?
I started my journey in to Azure on a project by performing a “lift and shift” phase where we were just migrating our existing workload into Azure. As it is the first phase you would want to match the performance for your on-premise VM to be the same as in Azure such as CPU, Memory, Disk Size, Disk IOPS. During this phase if you couldn’t find the right size match then you would most likely size up. As I stated before when I first started this journey managed disk was not introduced so we sized disk exactly as what they were on-premise. We didn’t want to do any optimisation at this stage as we wanted users and key business stakeholders to build up their confidence with cloud.
- There is no way to be able to resize a disk to be smaller without using a third-party tool so you would need a longer downtime to perform this action and possibly purchasing a tool. Another option would be to provision a new disk to the size you want and copy the data over but again this would require a longer downtime. With OS disk this get more complicated so you really have to think if it is worth the effort especially if the server will be decommissioned soon.
- Although you might want to size down the disk but each disk size offering has a maximum IOPS and throughput it can deliver so you will need to review the performance metrics of the disk to ensure that sizing down won’t hamper the performance of the disk for the server. If you were cross charging departments, they will need to understand why you sized a disk at 512GiB instead of 256GiB as requested by them. They need to understand that only 512GiB disk could deliver the required IOPS or throughput.
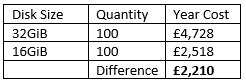
- Size up but why? for example a disk was sized at 100GiB and had already used around 80GiB, with Microsoft statement “Azure Managed Disks are priced to the closest tier that accommodates the specific disk size and are billed on an hourly basis” it meant we were already paying the high tier(128GiB) so why not just make the disk space available for the VM to use as you are already paying for it
- Most of the disk sizes provisioned on-premise was sized for growth over a period of 3-5 years. As we were resizing some of the disk smaller the show back cost appeared lower and departments were thinking great, we saving money BUT you need to let them know that the cost will go up as the data grows and the disk size will change. You are only trying to optimise the overall cost of running the server over a period of time. You need to reminder them that they can’t cut the budget as it will be needed eventually if the data does grow!!


No comments:
Post a Comment